Haymarket Mall is one of Fallout 4’s most rewarding locations, packed with valuable loot, dangerous enemies, and environmental storytelling that rewards careful exploration. Whether you’re hunting for rare weapons, completing specific quests, or simply looking to expand your Commonwealth knowledge, this pre-war shopping center delivers. This guide covers everything you need to know, from navigation and enemy encounters to loadout recommendations and strategic approaches. You’ll learn where to find the mall, what threats you’ll face inside, which items are worth the fight, and how to tackle it at any player level. Whether you’re running a melee build, a sneaky shadow, or a guns-blazing powerhouse, Haymarket Mall has something for everyone.
Key Takeaways
- Haymarket Mall is a high-reward pre-war shopping complex in Fallout 4’s southeastern Commonwealth filled with valuable loot, dangerous enemies, and environmental storytelling worth exploring.
- The optimal character level to tackle Haymarket Mall is 15–25 for balanced challenge; bring power armor, radiation resistance items, and weapons matching your build for maximum survival.
- Prioritize collecting high-value items with low weight like pre-war money, legendary weapons, ammunition, and nuclear material to maximize inventory efficiency and caps.
- Feral ghouls are the primary threat in Haymarket Mall—use area-of-effect weapons, maintain distance, and retreat to defensible positions rather than engaging in open combat.
- Stealth approaches are viable in the mall’s enclosed corridors if you have Sneak perks and suppressed weapons, allowing you to bypass groups or pick off isolated enemies efficiently.
- The mall functions as a respawning loot farm and mid-game testing ground, with legendary drops scaling to your character level and no permanent NPCs, making it ideal for revisiting at higher levels.
What Is Haymarket Mall in Fallout 4?
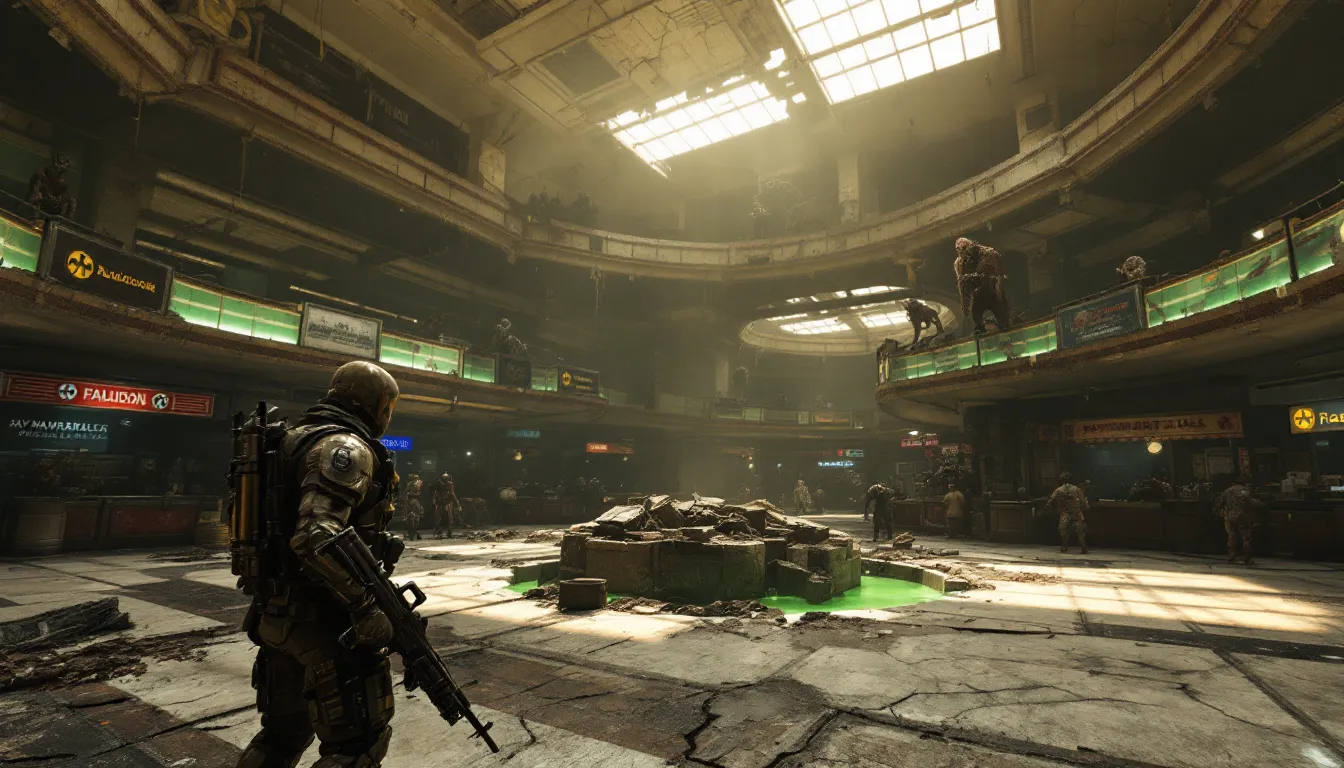
Haymarket Mall is a pre-war shopping complex in the Commonwealth, transformed into a dangerous scavenging hotspot after the Great War. Like most enclosed interior spaces in Fallout 4, it’s been reclaimed by the wasteland, expect radiation pools, collapsed floors, and hostile creatures claiming sections as their territory. The mall is significant because it contains multiple factions, valuable vendor stalls with rare items, and serves as a landmark for several side quests and exploration objectives.


The location is divided into several distinct zones: the main atrium, upper and lower levels, and connecting corridors. Each area presents its own environmental challenges and enemy types. Understanding the layout is crucial for efficient looting and minimizing backtracking. The mall also functions as a settlement opportunity for players looking to establish a community hub, though its interior combat zones make it less ideal than outdoor locations like Starlight Drive-In for that purpose.
What makes Haymarket Mall special is the density of pre-war loot concentrated in a single location. Pre-war items, like tableware, teddy bears, and chained safes, are highly valuable for both caps and for crafting settlement decorations. Beyond resource farming, the mall serves as a benchmark location where you’ll encounter mid-level threats consistently, making it ideal for testing build effectiveness or leveling combat skills.
How to Find Haymarket Mall
Location on the Map
Haymarket Mall is located in the southeastern portion of the Commonwealth map, roughly between the Boston area and the coastal regions. On your Pip-Boy map, you’ll find it marked automatically once you’re close enough or once you’ve discovered it through exploration. The exact grid coordinate falls in the lower-right quadrant of the explorable map. If you’re unsure of the direction, consult your map and look for the mall icon, it appears as a shopping-related marker once discovered.
The location sits in a relatively accessible area with nearby roads and settlements, making it easier to reach than more remote locations like the Glowing Sea or far northern outposts. There’s no single “correct” approach, multiple roads lead to the mall, and your route depends on which direction you’re coming from and which other locations you’re visiting.
Best Routes to Access the Mall
The most straightforward approach is from the main highways. If you’re traveling from Diamond City or the Boston Common area, head southeast and follow the road markers. The mall entrance is clearly visible once you’re in the vicinity, reducing navigation frustration.
For players coming from Sanctuary Hills or the western Commonwealth, travel southeast through established trade routes. You can pass through or near settlements like Covenant or Jamaica Plain depending on your exact path. Avoid unnecessary detours through Supermutant territory unless you’re prepared for combat.
The fastest route for experienced players is typically a direct path across the map using Fast Travel to nearby discovered locations and then moving on foot to the mall itself. If you haven’t discovered nearby Fast Travel points, it’s worth exploring the surrounding area first. Once inside the mall’s exterior perimeter, the entrance is unmissable, look for the storefront areas and doors leading into the main structure.
Enemies and Threats Inside Haymarket Mall
Common Enemy Types
Haymarket Mall hosts several prevalent enemy types depending on which sections you’re exploring. Ghouls, both feral and glowing variants, are the primary threat in most interior areas. Feral ghouls move erratically and attack in numbers, making them annoying but manageable for mid-level characters. Glowing ghouls are tougher variants with radiation damage auras and heightened aggression: they hit harder and require more ammunition to drop.
Radroaches and radroach colonies populate the darker, damper corners of the mall. They’re low-threat individually but can overwhelm through sheer numbers if you’re not careful with crowd control or area-of-effect weapons. Feral dogs occasionally occupy certain zones, though they’re less common here than in other Commonwealth locations.
In some upper-level sections, you may encounter Super Mutants or Supermutant variants if you’ve progressed far enough in the story or if your character level triggers stronger spawns. These are serious threats requiring sustained DPS or tactical positioning. Their melee range is dangerous, and their weapons pack significant damage output.
Mirelurks inhabit the flooded sections and water-damaged areas, particularly in lower levels or basements. These crustacean abominations are armored, tough to kill, and deliver high burst damage. Aim for the gaps in their carapace or use high-caliber weapons for consistent damage.
Hazards and Traps
Beyond living enemies, the mall environment itself is hazardous. Radiation zones are scattered throughout, particularly in basement areas and water-logged sections. Bring Rad-X and RadAway or wear radiation-resistant armor (power armor with radiation resistance mods is ideal). The radiation in flooded areas is often intense, so check your Geiger counter before wading in.
Collapsed floors and structural damage can cause fall damage if you’re not careful navigating upper levels. Some catwalks are partially intact, and missteps lead to significant health loss. Move deliberately in these areas rather than rushing.
Gas leaks and toxic fumes can be found in certain sealed sections. These deal continuous damage over time, so don’t linger unless you have chemical resistance perks or gear. Pressure plates occasionally trigger explosions or dart traps in specific treasure rooms, use the “Awareness” perk or move carefully when looting valuable containers.
Water-based hazards include mirelurk nesting grounds that are best avoided entirely if you’re low on supplies. If engagement is unavoidable, attack from distance rather than engaging in close quarters where their armored frames give them tactical advantages.
Complete Loot and Weapons Guide
Unique Items and Legendary Weapons
Haymarket Mall occasionally contains legendary weapons and armor, though legendary drops are RNG-dependent based on your character level and difficulty setting. The mall itself doesn’t guarantee specific unique items, but high-value containers (locked safes, master-level chests) have better odds of dropping legendary equipment compared to random trash containers.
Specific unique items tied to the location include various pre-war valuables: pre-war money (always grab it, high cap-to-weight ratio), nuka-cola variants, bobbleheads if you’re lucky, and holotapes with lore value or gameplay utility. The mall also spawns Nuka-Cola power armor paints and faction armor sets that respawn on subsequent visits, making it a useful farming location if you need specific cosmetics.
Legendary weapon types that commonly appear include combat rifles, assault rifles, 10mm pistols, hunting rifles, and pump-action shotguns. Less common but possible: laser rifles, plasma rifles, and minigun variants. The exact legendary effects vary (Explosive, Two-Shot, Furious, etc.), so you may need multiple visits to secure specific roll combinations for your build.
Common Loot and Resources
Common loot includes:
- Ammunition of all types, 9mm, .308, .44 Magnum, shotgun rounds, fusion cells
- Chems (RadAway, Rad-X, Psycho, Jet, Mentats)
- Food and water items
- Crafting materials: steel, aluminum, copper, nuclear material, adhesive
- Junk items with high scrap value for settlement building
- Clothing and armor pieces (usually standard, not legendary)
- Holotapes and skill books
- Pipe weapons (lower quality but decent for scrapping)
- Explosives: grenades, mines, and mini-nukes (in specific high-value containers)
Pre-war furniture, decorative items, and settlement materials are abundant, perfect for players focusing on settlement building. Tableware, toys, teddy bears, and other miscellaneous pre-war goods add up quickly in value relative to weight.
Best Items Worth Collecting
Prioritize collecting items with high cap-to-weight ratios and those with direct gameplay impact:
- Pre-war money (highest priority, zero weight, high value)
- Legendary weapons and armor (obviously)
- Ammunition if you’re low (weight-dependent: pick up high-value ammo like .308 or fusion cells first)
- Rare crafting materials: nuclear material, aluminum, adhesive if you’re building or modding weapons
- Holotapes with unique content or utility perks
- Faction armor sets for cosmetic variety
- Weapon mods and armor mods if you have inventory space
- Chems specific to your build (Fury for melee, Med-X for tanking, Psycho for burst damage)
Skip low-value bulk items unless you’re running a “hoarder” playthrough. Pipe weapons, basic clothing, and most non-legendary gear are vendor trash by mid-game. Focus on weight efficiency, you want to maximize value per inventory slot.
Before looting, consider using best Fallout mods to try that improve loot distribution or add new items to the location. Many community mods enhance the vanilla loot tables, adding more unique weapons or increasing legendary drop rates without breaking immersion.
Quests and NPCs at Haymarket Mall
Associated Quests
Haymarket Mall is associated with several side quests and world exploration objectives, though it’s not a central hub quest location. “The Great Hunt” and other Minuteman faction objectives occasionally direct players here for clearing raiders or specific enemy types. Completing these quests nets faction reputation and caps.
Some miscellaneous quests generated by settlement leaders or traveling NPCs may require resources found in or around the mall, specific weapon types, armor pieces, or crafting materials. These are generally lower-priority than main or faction quests but offer steady experience rewards and settlement morale boosts.
Unmarked quests and environmental storytelling emerge naturally when exploring the mall. Terminals with holotapes and notes reveal pre-war survivor stories, creating implicit objectives to investigate specific areas or recover items for personal reasons. These add depth to the experience beyond mechanical quest markers.
Notable Characters
Haymarket Mall doesn’t host permanent NPC settlements or major faction representatives, unlike Diamond City or the Minuteman settlement hubs. But, you may encounter traveling merchants or faction scouts passing through the area. These NPCs are temporary and don’t affect permanent game state.
The location occasionally attracts raiders or Supermutants claiming territory, functioning more as dynamic enemy spawns than stationary NPCs. Defeating them and clearing the area may yield faction quests from factions aware of the occupation.
Interiors contain robots in some sections, particularly in vendor areas that still have operational power cores. These robots may be hostile or neutral depending on your Robotics Expert perk and faction status. Peaceful robots can be hacked for additional loot or simply left undisturbed.
Terminals throughout the mall contain logs from pre-war employees and survivors, providing ambient lore but no interactive quests. Reading these terminals enriches the location’s storytelling without mechanical rewards, though some terminals may unlock bonus loot or doors.
Tips and Strategies for Exploring Haymarket Mall
Recommended Level and Gear
Haymarket Mall scales with your character level, so difficulty fluctuates. Ideally, tackle it around character level 15-25 for a balanced challenge that yields good loot without requiring endgame gear. Below level 15, expect tougher fights and lower legendary drop rates: above level 30, most threats become trivial, though loot tables scale accordingly.
Essential gear before entering:
- Body armor (combat armor, leather armor, or power armor for serious protection)
- Weapons with solid DPS for your build: combat rifle, hunting rifle, shotgun, or melee weapon
- Defensive supplies: RadAway, Rad-X, Med-X, stimpacks
- Light armor or sneaky clothing if you’re running a stealth build (leather armor with muffled mod, shadowed coatings)
- Utility items: lockpicks, hacking tools (magazines and bobbleheads count), grenades, mines
Power armor is useful but not required, it provides excellent radiation protection for the flooded basement areas and increases survivability against Mirelurks. If you’re using power armor, ensure your Fusion Cores are charged: running out mid-combat is a death sentence.
Combat Tactics and Preparation
Feral ghouls are your primary concern. They’re fast, deal moderate damage, and spawn in packs. Tactical approach: keep distance, use area-of-effect weapons (grenades, mines, shotguns) to manage groups, or target high-priority threats first with rifles. Don’t get swarmed, retreat to defensible positions (doorways, corners with limited approach angles) and let ghouls come to you.
For Mirelurks, maintain distance and aim for gaps in their armor. Explosives are highly effective, grenades or mines soften their defenses before you move in with primary weapons. Never engage them in water where they have mobility advantage: pull them onto dry ground if possible.
Supermutants require sustained damage and smart positioning. They have high health pools and hit hard in melee. Use cover effectively, apply critical hits when possible (headshots deal bonus damage), and don’t attempt close-quarters combat unless you’re running a dedicated melee tank build with high armor values.
Use V.A.T.S. liberally for guaranteed hits, especially against quick-moving targets like ghouls. Build your Critical strike chance through perks and gear, then dump critical hits into high-priority targets. Pause and reassess after each major engagement rather than rushing through the mall.
Stock stimpacks and rad resistance items before entering. Once inside, ration your consumables, use stimpacks when health drops below 50%, not immediately. Preserve expensive chems for tougher encounters rather than routine damage.
Stealth and Avoidance Approaches
Stealth is viable if your character has sufficient Sneak perks and uses a suppressed weapon. Sneak strategy: stay crouched, move slowly, and pick off isolated enemies before they alert groups. Use suppressors on your weapon, without them, gunshots alert the entire area.
Haymarket Mall’s enclosed spaces actually favor stealth compared to open-world areas, corridors and rooms create natural sight lines and sound barriers. Crouch behind corners, target isolated enemies first, and avoid triggering compound engagements.
Invisibility potions (Invisibility boyos) or perks granting temporary invisibility let you slip past groups entirely. This is useful if you want to rush to specific loot containers or avoid wasting ammunition on minor threats.
Complete avoidance is possible for specific sections. You don’t need to clear every enemy, if you’ve got what you came for (specific loot, quest objective), leaving is perfectly valid. The mall respawns enemies anyway, so clearing it entirely doesn’t provide lasting benefits beyond initial loot.
For stealth melee builds, silencers don’t apply, but your high armor and health pool let you absorb punishment. Crouch-approach isolated enemies, get critical hits with melee weapons (power attacks, sneak attacks), and backstab when possible for massive damage multipliers.
Consult resources like IGN’s Fallout 4 guides for build-specific stealth tactics and GamesRadar+ coverage of location-specific strategies that may have evolved with community discoveries. Also, Nexus Mods offers balance-adjusting mods that tweak enemy difficulty or player power if the default difficulty feels mismatched to your build.
Conclusion
Haymarket Mall rewards thorough exploration with valuable loot, decent experience, and narrative depth tied to pre-war America’s final days. Whether you’re a completionist mapping every location, a treasure hunter maximizing legendary drops, or a player seeking mid-game combat challenges, the mall delivers on all fronts.
Your approach depends on your character’s strengths, high-armor tanks can wade through ghouls, sneaky characters eliminate threats without triggering alarms, and ranged builds maintain distance control. The location scales with your level, so revisiting at higher levels yields tougher enemies and potentially better legendary drops.
Plan your loadout, bring adequate supplies, and approach methodically rather than rushing. Haymarket Mall is one of the Commonwealth’s more profitable locations for casual looters and serious completionists alike. With the strategies and information above, you’re ready to clear it efficiently and walk away with valuable gear and plenty of caps.